
Creating a beautiful garden path is an easy way to enhance the overall look and feel of your outdoor space. Garden paths serve not only a practical function, guiding visitors through different zones of your landscaping, but they also add aesthetic appeal. Homeowners looking for affordable and do-it-yourself options will find there are a plethora of materials and designs that can be used to construct a stylish and functional walkway on a budget.
Utilizing inexpensive materials such as gravel, stepping stones, and recycled pallet wood, anyone can create an inviting path that blends seamlessly with their garden’s design. The project’s simplicity allows for personal customization and can often be completed within a weekend. The affordability of these materials means that even those on a strict budget can transform their garden’s accessibility and appearance.
A well-constructed path not only directs foot traffic away from delicate plants but also helps to minimize the likelihood of soil compaction in garden beds. This, in turn, promotes healthier plant growth. With the right approach, a garden path can provide a practical solution to garden navigation while also serving as a charming landscape feature that adds value to your property.
Gravel Path: A Cost-Effective Garden Pathway

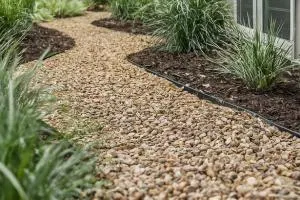

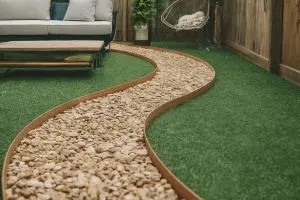

Creating a garden path with gravel is one of the most affordable and simple ways to enhance a garden’s aesthetics and functionality. Gravel paths provide a permeable surface, allowing water to filter through and reduce runoff. They also suppress weed growth and are relatively low-maintenance.
Materials Needed:
- Landscape fabric
- Gravel (pea gravel, crushed stone, or decomposed granite)
- Edging material (plastic, metal, stone, or wood)
- Landscape staples
Step-by-Step Guide:
- Outline the path using stakes and string to ensure it has a clear direction.
- Excavate the soil to a depth of around 4 inches along the planned path.
- Lay landscape fabric to inhibit weeds, securing it with staples.
- Install the edging along both sides of the path to contain the gravel.
- Fill the path with gravel, about 3 inches deep, and rake it to level the surface.
Tips for Maintenance:
- Regularly rake the gravel to keep the path level and even.
- Top up with fresh gravel as necessary to maintain depth and refresh appearance.
- Manage weeds that may emerge by hand-pulling or using natural herbicides.
Cost Considerations:
- Gravel is one of the most budget-friendly materials, with prices varying based on type and quantity.
- Bulk purchase reduces the cost further compared to bagged gravel.
- Installing a gravel path is labor-intensive but manageable as a DIY project, saving on professional installation fees.
Gravel paths are not only practical and durable, but they also blend seamlessly with various garden styles, from rustic to contemporary. With a range of colors and textures available, they can be customized to complement any garden design.
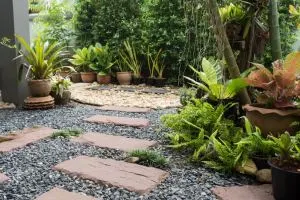
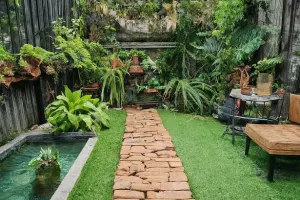
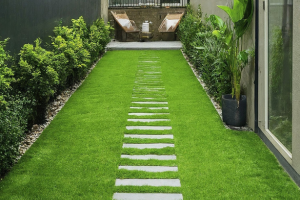
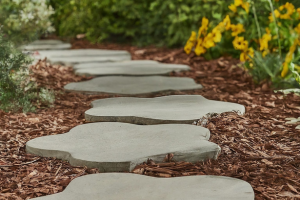
Stepping Stone Path: Charming and Budget-Friendly


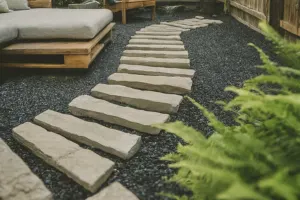
Creating a stepping stone path is an effective way to enhance a garden’s aesthetic while also being economical. These paths serve both practical and decorative purposes, guiding visitors through the garden and adding a touch of charm.
Materials Needed:
- Stepping stones (natural stone, concrete pavers, or recycled materials)
- Landscaping fabric
- Sand or fine gravel
- Level
- Shovel or garden trowel
Steps:
- Design the Layout: Determine the path’s course through the garden, ensuring it flows naturally and provides easy access to all areas. Space the stones to match a comfortable stride.
- Prepare the Base: Clear the path of any vegetation and lay landscaping fabric to prevent weed growth. Top the fabric with a layer of sand or fine gravel for stabilization.
- Place the Stones: Lay the stones on the sand base, leaving adequate spaces between them. Use the level to ensure each stone is flat to prevent tripping hazards.
- Finish the Path: Fill gaps between the stones with sand, soil, or low-growing ground cover plants for a polished look.
By using recycled materials, such as old bricks or salvaged concrete, costs can be further reduced. Additionally, one might consider creating their own concrete pavers, adding personal touches like leaf imprints or colored stones for a unique touch.
Stepping stone paths are simple to install, requiring minimal tools and materials. Their versatility in design allows for integration into almost any garden style, and with proper placement and maintenance, they provide a functional and attractive garden feature.
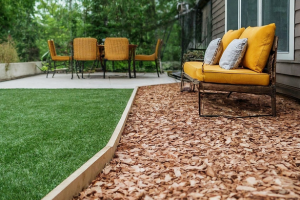
Mulch Path: Practical and Affordable Garden Walkway

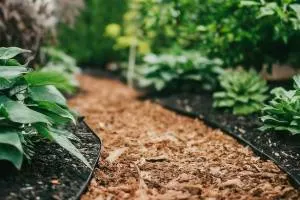
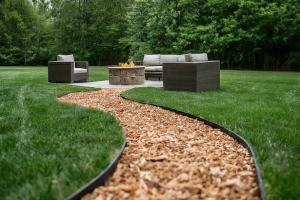

Creating a mulch path is a cost-effective way to enhance a garden’s functionality and aesthetic appeal. Mulch, a material frequently used to cover the soil, serves well as a walking surface. It suppresses weeds, retains soil moisture, and integrates seamlessly into the natural landscape.
A standard mulch path requires:
- Measuring tape: To determine the length and width of the desired path.
- Landscape fabric: To inhibit weed growth.
- Shovel: For excavating the path area.
- Mulch: Such as wood chips, bark, or shredded leaves.
Steps to Install a Mulch Path
- Outline the Path: Use a garden hose or string to mark the intended path shape.
- Excavate: Dig up to 3-4 inches of soil to create a flat surface.
- Lay Fabric: Install landscape fabric, cutting to fit, and overlay edges by a few inches.
- Add Mulch: Spread mulch over the fabric to the desired thickness.
Note: Depth should be approximately 2-3 inches to ensure coverage and comfort underfoot.
Maintenance Tips
- Rake: Regularly to keep the surface even.
- Top-up: Annually add fresh mulch to maintain depth and freshness.
- Check: Periodically for fabric breaches by weeds and repair as needed.
Utilizing a mulch path can be straightforward and rewarding, creating a functional and picturesque pathway for any garden while adhering to a tight budget.
Recycled Brick Path: Sustainable and Stylish
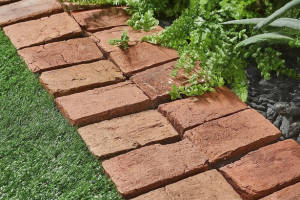


Creating a garden path with recycled bricks is not only eco-friendly but also adds a classic charm to any garden. Homeowners can take pride in reusing materials that might otherwise end up in a landfill.
Materials Needed:
- Recycled bricks
- Sand or crushed stone (base layer)
- Landscape fabric (weed barrier)
Step 1: Preparation. They must measure the desired path width and length. Clearing the area of debris and leveling the ground is crucial for stability.
Step 2: Base Layer. A layer of sand or crushed stone must be spread evenly. This secures a solid foundation and assists with drainage.
Step 3: Laying Bricks. Starting from one end, bricks are placed snugly against each other on the base layer. Varying brick colors or sizes can create unique patterns.
Step 4: Weed Barrier. Laying landscape fabric underneath can prevent weed growth and provide extra stability.
Step 5: Filling Gaps. Sand is swept over the path, filling spaces between bricks. This enhances the path’s integrity.
List of Benefits:
- Durability: Bricks withstand weather and foot traffic.
- Aesthetics: Varied hues from recycled bricks yield a timeless look.
- Low Maintenance: Requires minimal upkeep once installed.
- Cost-Effectiveness: Utilizing recycled materials can be more affordable than new products.
Incorporating this sustainable option, the homeowner contributes to a circular economy, while achieving a balance between functionality and aesthetics. This DIY project affirms that stylish garden additions can be both environmentally conscious and economically savvy.
Wood Chip Path: Budget-Friendly and Eco-Friendly


Wood chip paths provide a simple and cost-effective solution for garden walkways. The natural decomposition of wood chips enriches the soil, promoting a sustainable garden environment. They are readily available, often as a byproduct from local tree trimming services, making wood chips an eco-conscious choice.
Materials and Tools:
- Wood chips: The main material for the path.
- Landscape fabric: To suppress weed growth.
- Gloves: To protect hands during installation.
- Wheelbarrow: For transporting wood chips.
- Rake: To level the wood chips.
Installation Steps:
- Measure the area for the garden path.
- Clear the path of any debris and weeds.
- Lay landscape fabric to prevent weed growth.
- Spread wood chips evenly, using a rake to achieve a uniform depth of 2-3 inches.
- Water lightly to settle the chips and reduce movement.
Maintenance involves periodic topping up as chips decompose or disperse. They offer excellent drainage, reducing puddles and muddiness on the path. When they break down, simply turn them into the soil and add a new layer, thereby recycling the material and nurturing the garden bed.
In summary, a wood chip path is an affordable, low maintenance, and environmentally friendly option for gardeners seeking a practical and attractive walkway solution.
Grass Path: Simple and Natural Garden Trail

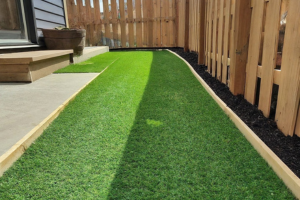
Grass paths offer an eco-friendly and cost-effective solution for creating walkways through a garden. They integrate seamlessly with the landscape, providing a soft and natural look. To establish a grass path, one should consider the following steps:
- Initial Layout: Mark the path’s boundaries using string lines or garden hoses, shaping it to blend with the existing garden.
- Soil Preparation: Remove any weeds or debris and rake the soil to level the pathway.
- Grass Selection: Choose a hardy grass species suitable for foot traffic and local climate conditions.
- Planting: Sow grass seeds or lay turf over the prepared soil. Ensure good soil-to-seed contact or root-to-soil contact for turf.
- Maintenance: Regular mowing, watering, and fertilizing are essential to maintain the health and appearance of the grass path.
Advantages:
- Cost-effective: Requires minimal materials.
- Environmentally friendly: Grass is a natural material that promotes biodiversity.
- Comfort: Provides a soft surface to walk on.
Considerations:
- Regular maintenance required.
- May not be suitable for high-traffic areas.
- Can become muddy in wet conditions.
By following these guidelines, one can create a charming and practical grass path that invites visitors to meander through the garden while blending harmoniously with its surroundings.
Pea Gravel and Paver Path: Stability with Visual Appeal
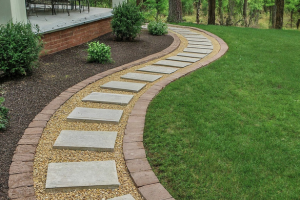

Creating a garden path that is both stable and visually appealing can be achieved through a combination of pea gravel and pavers. The contrast between the natural, loose texture of the gravel and the solid, structured appearance of pavers provides both an aesthetic and functional advantage to garden pathways.
Materials Needed:
- Pea gravel
- Pavers (stone, concrete, etc.)
- Landscape fabric
- Edging material (metal or plastic)
Steps for Installation:
- Measure the intended path area to calculate the amount of materials needed.
- Lay down landscape fabric to prevent weed growth and to stabilize the gravel.
- Install edging along the path to keep the gravel contained.
- Place pavers evenly spaced to act as stepping stones.
- Fill in around pavers with pea gravel, ensuring level with the top of pavers.
Advantages:
- Aesthetics: Pleasing contrast between pavers and gravel.
- Drainage: Pea gravel allows for excellent water drainage.
- Flexibility: Path can curve or flow to fit garden layout.
Maintenance Tips:
- Rake gravel regularly to maintain an even surface.
- Check pavers annually to ensure they are secure and level.
- Top up gravel as needed to compensate for displacement and settling.
This type of garden path provides a balance of casual charm and formality, integrating seamlessly into a variety of garden styles while ensuring a stable surface for foot traffic.
Concrete Stepping Stones: DIY Budget-Friendly Pathway

Creating a garden pathway doesn’t need to be expensive. Concrete stepping stones are a cost-effective and customizable option for homeowners.
Materials Needed:
- Quick-setting concrete mix
- Mixing bucket or wheelbarrow
- Water
- Stepping stone molds
- Trowel
- Decoration items (optional)
First, one must prepare the mold by applying a non-stick spray or oil to aid in the later release of the concrete. Next, mix the concrete in a bucket or wheelbarrow according to the manufacturer’s instructions. Care should be taken to achieve a consistent mixture, neither too dry nor overly wet.
Pour the mix into the molds, smoothing it with a trowel. At this point, personalization can occur by pressing decorative items such as pebbles, tiles, or glass pieces into the wet concrete for a unique touch. Allow the stones to cure for at least 48 hours.
Once dried, the stones can be removed from the molds. The surface should be leveled to create a stable walking surface. The stones can be placed directly onto grass, or they might be set on a bed of sand or gravel for improved drainage and stability.
Installation Tips:
- Space the stepping stones at a comfortable stride length apart.
- Use a level to ensure each stone is flat to prevent tripping hazards.
- Press each stone firmly into the ground to seat them securely.
Concrete stepping stones offer a blend of functionality and creativity, lending a personalized touch to garden pathways without straining the budget. Their durability and simplicity make them an accessible project for DIY enthusiasts.
Shell Path: Coastal-Inspired Garden Trail
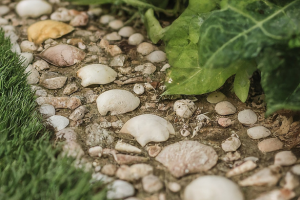

Creating a shell path is a cost-effective and visually appealing way to add a coastal-inspired charm to any garden. Shells can be sourced from local beaches, purchased from garden centers, or found at shell recycling programs. This unique path idea not only provides a durable walking surface but also offers an eco-friendly solution by repurposing natural materials.
Before starting the path, one should outline the desired route with a string or garden hose to provide a visual guide. It’s crucial to remove any weeds and to level the ground. Laying a weed barrier fabric can help prevent unwanted growth.
Materials Needed:
- Crushed shells or whole sea shells
- Weed barrier fabric
- Edging material (wood, metal, stone)
Instructions:
- Prepare the Base: Clear the designated path area of vegetation and level the soil. Compact the ground to provide a stable base.
- Install the Edging: Place the chosen edging along the path sides to contain the shells and give the path a clean, defined look.
- Lay the Barrier: Roll out the weed barrier fabric over the path, cutting it to fit as required.
- Spread the Shells: Distribute the shells evenly over the barrier, ensuring a depth of at least 2 inches for adequate coverage.
Shells typically require minimal maintenance and can last for years. They naturally interlock and compact over time, creating a stable walking surface. As they break down, shells contribute beneficial minerals to the surrounding soil, further enhancing the garden’s ecosystem.
For a personalized touch, one might intersperse colored glass or stones among the shells. This customization not only adds visual interest but can also serve to guide visitors along the garden trail.
Mosaic Tile Path: Colorful and Artistic Garden Walkway
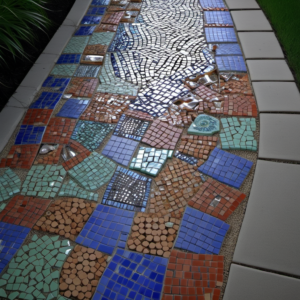

Creating a mosaic tile path is a simple and affordable way to add a touch of artistry to any garden. This project involves embedding small, colored pieces of tiles into a concrete base to form a durable and visually appealing walkway.
Materials Needed:
- Mosaic tiles (broken pieces of ceramic or glass)
- Concrete mix
- Trowel
- Mortar
- Grout
- Sealer
- Gloves
- Safety glasses
Steps:
- Design Layout:
- Plan the path.
- Excavate the area to about 6 inches deep.
- Level the soil and add a layer of gravel for drainage.
- Prepare Tiles:
- Collect or purchase tiles.
- Sort by color and shape.
- Break into smaller pieces, if necessary.
- Mix Concrete:
- Following manufacturer’s instructions, prepare the concrete.
- Pour into the pathway mold or directly onto the ground.
- Smooth with a trowel.
- Place Tiles:
- While the concrete is still wet, press tiles into desired pattern.
- Ensure even spacing and level placement.
- Curing:
- Allow concrete to set and cure as per the recommended time.
- Grout Application:
- Mix and apply grout between the tiles.
- Wipe off excess grout.
- Let it dry.
- Sealing:
- Apply a sealer to protect the mosaic tiles from weathering.
This project can be tailored to fit any garden theme or color scheme. It allows for personal creativity, as the pattern and tile choice can be unique to each individual’s taste. The result is a sturdy and personalized garden path that will enhance the overall aesthetic of the outdoor space.
Conclusion
A garden path adds both functionality and aesthetic appeal to a garden. Budget-conscious gardeners can select from a wide array of DIY options that are cost-effective and simple to implement. Recycled materials such as pallet wood, bricks, or stones offer a sustainable choice, while gravel and mulch paths provide affordability and ease of installation.
- Creativity and practicality are key in choosing the right solution.
- The garden’s style and the homeowner’s preferences should dictate the path’s design.
Maintenance considerations are vital; for longevity, paths need to be durable and weather-resistant. When installing a garden path:
- Plan the layout carefully.
- Ensure proper ground preparation to avoid future issues.
- Select materials that complement the garden’s overall look.
Investing time in the construction of a garden path will enhance one’s outdoor space and potentially increase property value. Gardeners are encouraged to:
- Experiment with different materials
- Mix and match textures for a unique look
- Consider the environment to determine the best fit for their garden’s conditions
Ultimately, a well-constructed garden path serves as a guide through the landscape, inviting visitors to explore and enjoy the natural surroundings with ease.